Add the new Calibration Instrument to EasyCal in the normal way, i.e. from EasyEdit’s main menu, select option “System Setup” then “Calibration Instruments”.
The screen will look like this:

Click “Add…” to create a new calibration instrument. You must select “GPIB/RS232” as the type of instrument in order to use Readback.
Enter the standard details of the calibration instrument such as certificate number, calibration interval etc.
Enter the communication settings of the instrument – either GPIB address or RS232 port number, parity (N/E/O), baud rate, data bits, stop bits.
Now tick the box labelled “Supports Readback”. Some more options will appear:

The box labelled “ASCII Code of Readback Terminating Character” needs filling in if either:
- The instrument is using RS232
- The instrument is using GPIB without “EOI” (i.e. old GPIB instruments)
This box contains the ASCII code of the character sent by the instrument at the end of the readback data – when EasyCal receives this character it knows to stop reading the data.
The character is usually linefeed (ascii code 10) or carriage return (ascii code 13). Refer to the instrument’s documentation for the actual ascii code.
As we are creating a new user-defined readback driver, click the “New Driver…” button.
User-defined Readback Driver Entry Screen
A screen will open to allow entry of the User-defined Readback Driver:

The screen is divided into two halves:
- Readback Driver Parameters (left-hand side)
The contents of these fields tell EasyCal how to interpret the readback data from the instrument.
- Test Area (right-hand side)
Allows the user to test the readback driver settings instantly, so they can check if they are working properly before use in a calibration run.
Driver ID
The identity of the user readback driver. It should be meaningful to the user, e.g. the type of instrument(s) it is used with (e.g. “HP DMM”)
Discard Readback Data if any of these apply…
As well as valid readings, an instrument can return other information to the computer via readback, such as error conditions. EasyCal needs to know how to differentiate valid readings from invalid readings such as error messages. The categories in this box allow invalid readings to be identified and therefore discarded by EasyCal
…It is more than _ characters long
Tick this box and enter a value if readback longer than a certain number of characters should be discarded
…It contains these characters
Tick this box and enter a value if readback shorter than a certain number of characters should be discarded
…It contains these characters
Use these boxes to discard readback that contains certain characters. E.g. if error messages contain the characters “error” then type “error” into a box. To discard readback that contains either one string or another enter each string into a different box.
…It starts with these characters
To discard readback that starts with a certain character/sequence of characters enter them here. The four boxes allow up to 4 different start sequences to be discarded.
…It does not contain these characters
If all readback should be discarded unless it contains certain characters, e.g. “value=” then enter those characters here.
Format of Readback Data…
There are 3 basic formats of readback data that different instruments use. Select one of these using the options below:
…Readback data consists of 2 or more fields
If the instrument’s readback data comprises 2 or more parameters (e.g. value and error code) separated by a delimiting character, e.g. a comma, then select this option.
Another example would be where the readback data comprises the value then a space and then the units. The units must be discarded so in this case select this option and add “ ” (space) as the delimiter and field 1.Note: The “Edit Delimiters..” button is used to add delimiters. It allows entry of one or more delimiters, e.g. space and comma may both be specified if they can both occur.
…Value is at fixed character positions within the readback field
If the value always occurs in the same positions within the readback string, select this option. E.g. there are two spaces, then a 5 character readback value then 3 more spaces.
Note: This format is uncommon.
…Continuous single-field text string
Select this option if the value comes back without other characters or parameters. This is the simplest form of readback data.
Ignore Non-numeric characters
Numeric characters are those found in numbers, i.e. digits 0-9, + (plus), – (minus) and “e” (exponent).
By ticking one or both of these options non-numeric characters can be automatically discarded before or after the value itself.
Note: Keep these boxes both ticked unless the specific format of the instrument’s readback data causes problems.
Value needs converting to make it compatible with the Required Units of a test
The readback value returned by the instrument may be in different scaled units to the units specified in the test entry screen. E.g. the readback value may always be in volts, but the required value in the test is specified in millivolts.If this is the case (as is most common) then tick this box. A conversion table to use must be specified. If the readback value returned by the instrument is in “unified” units, i.e. base units such as volts, amps, henrys, ohms etc. then select “[Unified]” as the conversion table. If the readback value is in other units, such as always millivolts” then click “New…” to add a new conversion table. See section “Conversion Tables” below for details.
Test Area
The test areas on the right-hand side of the screen allows you to test the readback driver settings immediately, without having to perform a calibration run.
You must have the instrument connected and running to use the test area.
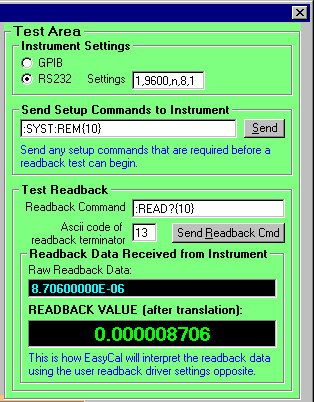
Instrument Settings
Enter the GPIB/RS232 settings of the instrument.
Send Setup Commands to Instrument
Most instruments require some commands to be sent to them before readback can take place, e.g. to put the instrument into remote control mode (with SCPI-compatible instruments this command is often “:SYST:REM”. Remember to finish with a terminating character if necessary, e.g. “{10}” to send a linefeed.
Readback Command
Enter the command needed to cause a single readback string to be sent by the instrument. E.g. with an HP DMM 34401 the command is “:READ?”. Again remember the terminating character if required. When you click the “Send Readback Cmd” button, this command is sent and the data readback will be displayed in the “Raw Readback Data” window.
Raw Readback Data
This contains the complete readback data sent by the instrument.
Readback Value (after translation)
This contains the readback value after all the parameters on the left-hand side of the screen have been applied. By checking that the value displayed in this box is the correct value you can be sure that the parameters specified in the readback driver are correct.